Microneedle RF Machines Training FAQ
With these guidelines, you can confidently set up, operate, and perform safe, effective treatments using Microneedle RF Machines for both face and body applications.
Machine Basics
Q: What is the principle of Microneedle RF?
A:
The principle of Microneedle RF combines microneedling technology with radiofrequency (RF) energy to achieve deep skin regeneration and anti-aging effects.
The combination of microneedling and RF technology means that the micro-channels created by the needles allow the RF energy to penetrate more deeply and precisely into the skin, making the treatment more effective and the results more pronounced. The thermal stimulation from RF activates the skin’s self-repair mechanisms, enhancing the natural healing response triggered by microneedling.
Q: What are the main functions of the device?
A:
Skin Rejuvenation and Firming: Reduces fine lines and wrinkles, tightens sagging skin, improves skin texture and tone, and minimizes pores.
Scar Treatment: Effectively reduces all types of scars.
Fat Reduction and Body Contouring: By coagulating fat and shrinking connective tissue, it helps reduce localized fat deposits, improves cellulite, and firms the skin on the body.
Helps improve acne-prone skin: Effectively treats active acne, reduces oil production, and eliminates acne bacteria.
Enhanced Skincare Absorption: Creates microchannels, allowing nutrients, repairing solutions, and antioxidants to penetrate deeper into the skin.
Other Applications: Can also be used for postpartum repair (e.g., stretch marks), treatment of underarm odor and excessive sweating, and daily skin care.
Q: Which skin layers does Microneedle RF target?
A:
Epidermis Dermis(0.25 – 0.5 mm)
Papillary layer Dermis(0.5 – 1.5 mm)
Reticular layer(1.5 – 3.5 mm)
Subcutaneous tissue(3.5 – 4.0 mm+)
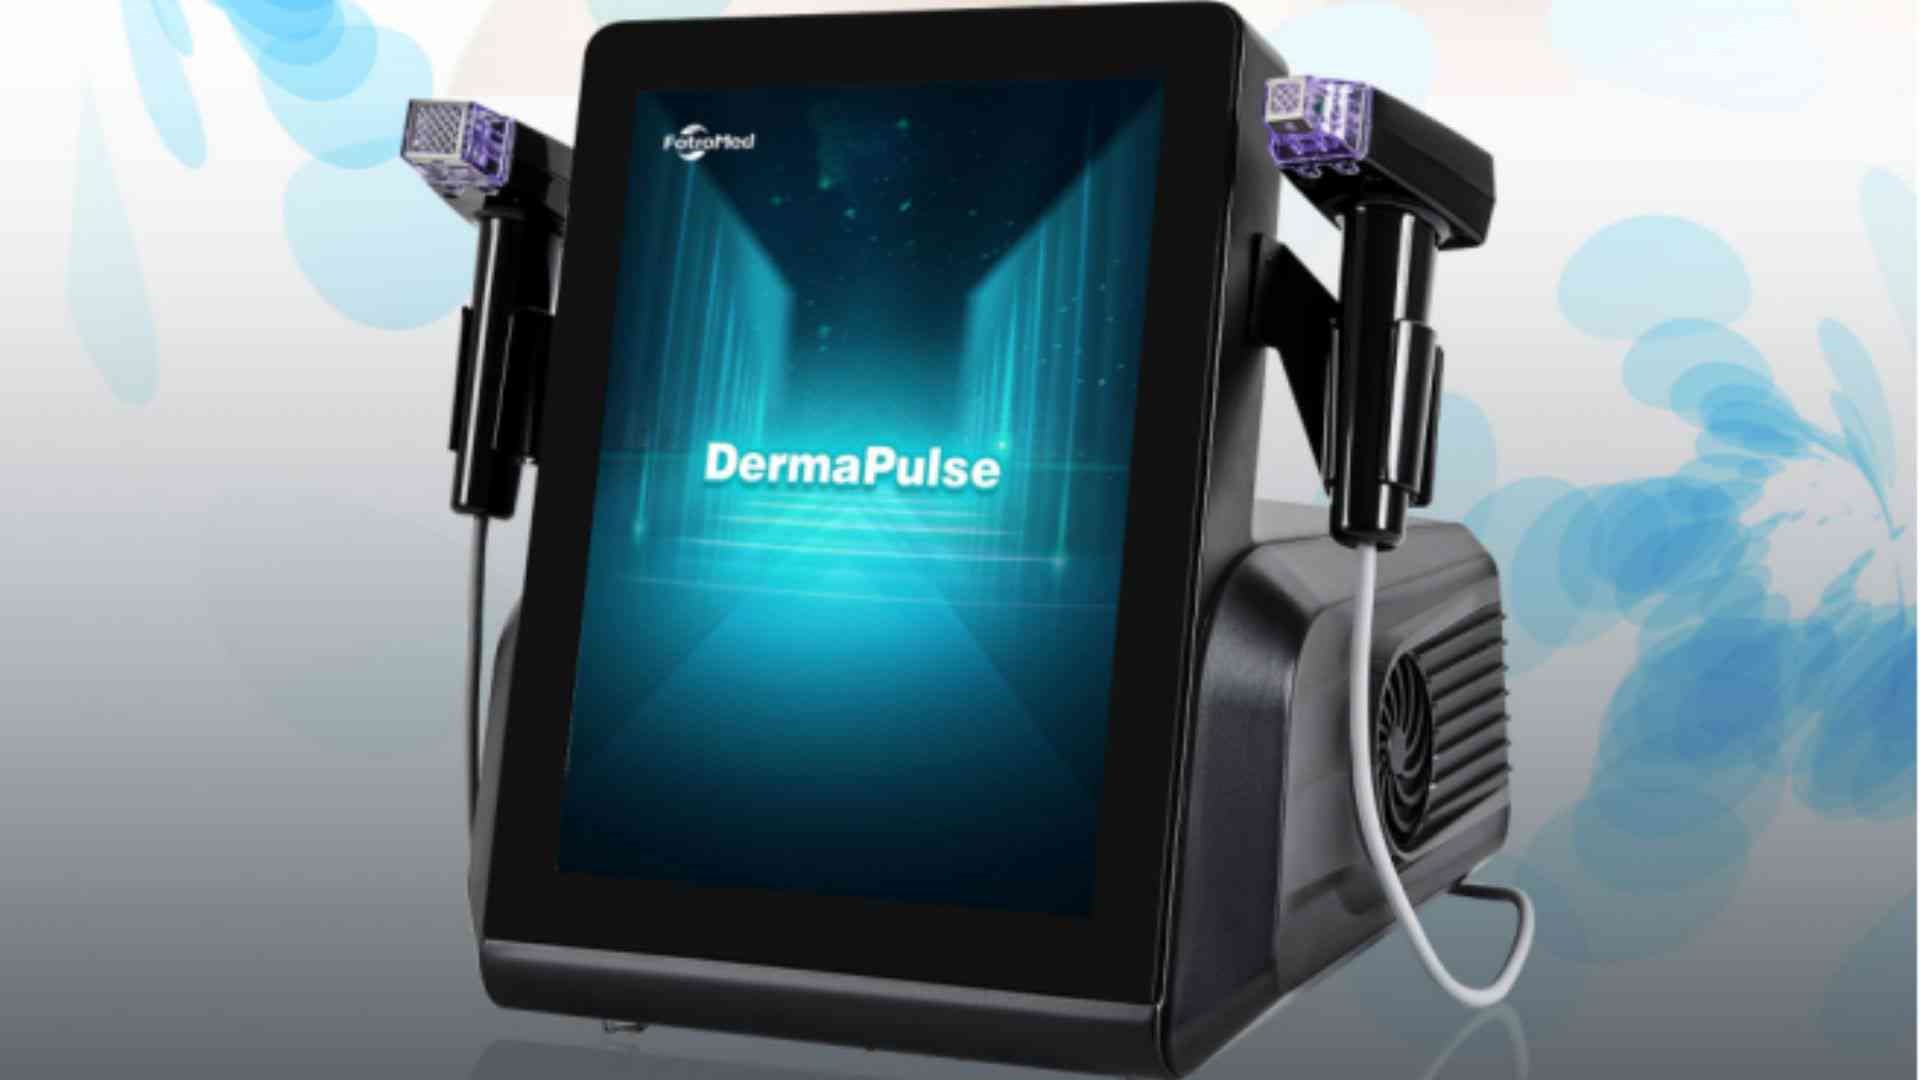
Handpiece & Cartridges
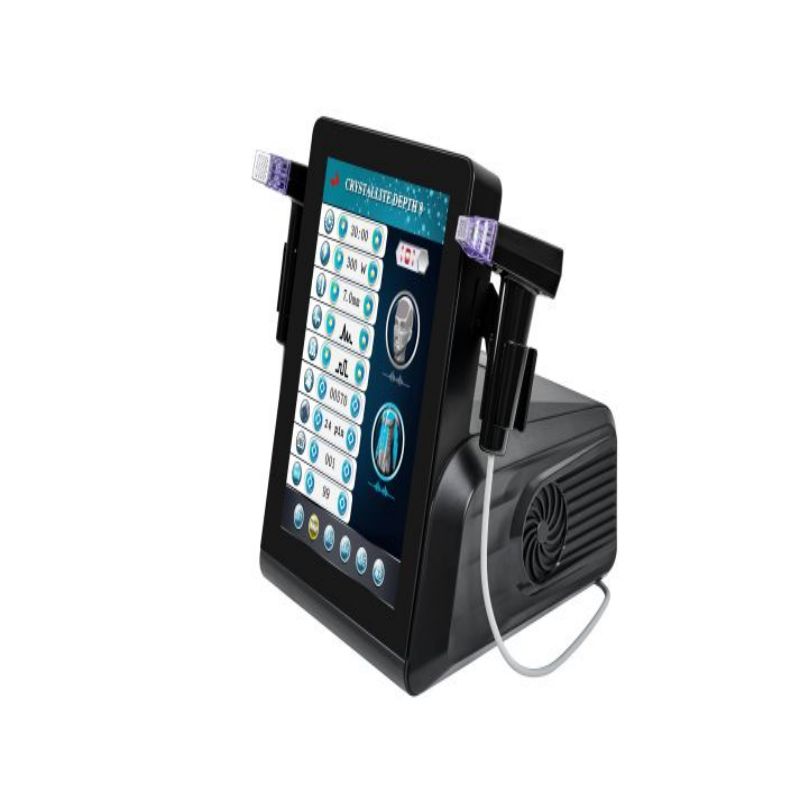
Q: How many handpieces does the device include?
A:
2 handpieces
4 cartridges
(12/40/24/nano pins)
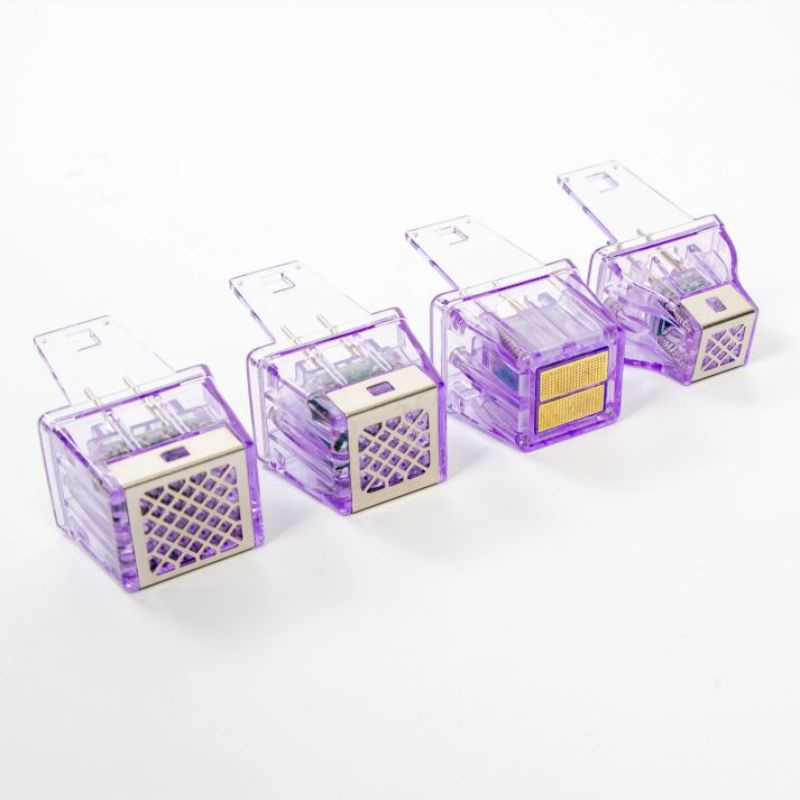
Q: What types of cartridges are available and their depth ranges?
A:
12P: Primarily used for smaller or more compact treatment areas, such as the eye area and nose. It can also be used on curved and shallow areas of the body, such as the upper lip.
24P: Primarily used for the face and neck, including bony areas (such as the forehead and chin) and soft tissue (such as the neck). Suitable for comprehensive facial treatment.
40P: Designed for larger areas of the body requiring deeper tissue treatment.
Nano-probe: Primarily used for enhanced skincare product delivery and firming.
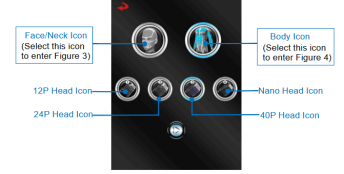
Q: How can cartridges be identified?
A:
On the device’s operating interface, there will be an icon showing the current probe type. When the operator selects the operating system, he needs to select the icon corresponding to the treatment probe currently in use and ensure that it is consistent.
Q: What is the difference between insulated and non-insulated needles?
A:
Insulated Needles:
- Protecting the Epidermis: Insulated needles protect the epidermis from thermal damage throughout the treatment. This means that only the needle tip delivers RF energy, while the needle shaft is covered with an insulating coating to prevent excessive heating of the epidermis.
- Precise Energy Delivery: Insulated needles heat only the fat and dermis at high energy settings. This design ensures that RF energy is precisely delivered to the deeper layers of the skin, such as the dermis and subcutaneous fat, while minimizing the risk of superficial skin damage, particularly burns and hyperpigmentation.
- Enhanced Safety: By protecting the epidermis, the use of insulated needles improves treatment safety, reduces the risk of post-operative darkening (hyperpigmentation), and makes them suitable for all skin tones.
Uninsulated Needles:
- No Epidermal Protection: Uninsulated needles lack an insulating coating, so during treatment, the epidermis and all skin layers are equally heated by the RF energy.
Potential Epidermal Damage: Due to the lack of epidermal protection, uninsulated needles may damage the epidermis during use. This increases the risk of superficial burns and post-operative hyperpigmentation.
Q: Are cartridges reusable?
A:
Reusing cartridges can easily lead to cross infection. To ensure hygiene and patient safety, these cartridges are designed for single use.

Startup & Basic Operation
Q: What do the main screen icons represent?
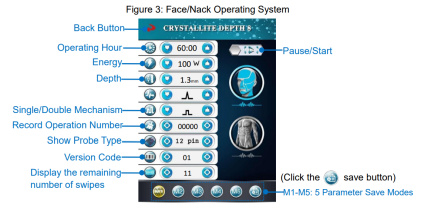
Q: How does the shot counter work?
A:
Function: It records the number of operations you perform.
Reset: You can click the counter icon [ ] to reset and clear the recorded number of times.

Q: Can treatment parameters be saved?
A:
The device provides five parameter saving modes, [M1] to [M5]. You can customize and store your ideal parameter combination for quick recall later.

Pre- & Post-Treatment Guidelines
Q: What preparations are needed before treatment?
A:
Device Connection and Inspection:
- Ensure the device is properly connected to the power source and that the power outlet is properly grounded.
- Check the power cord connection and confirm that the power switch is on.
- Connect the handle to the handle socket on the back of the device, align it, and insert it.
Connect the foot switch:Ensure the device is properly connected and that the handle is clean and disinfected.
Probe Preparation and Installation:
- Align the probe with the handle, push it in, and secure it with the snap.
- Before use, the operator should check the function of the handle and probe, ensuring that the needle protrudes and retracts properly and that the needle is not bent or deformed. Do not use if the needle is deformed.
- On the device interface, select the icon corresponding to the treatment probe currently being used and ensure consistency.
Client Preparation:
- Removing Metal Objects: Before the procedure, the client must remove any metal jewelry to prevent unintended radiofrequency conduction.
- Skin Cleansing and Disinfection: Cleanse the skin thoroughly. If the treatment area is heavily haired, shave it beforehand.
- Apply anesthetic/numbing ointment evenly and cover with plastic wrap for approximately 30-45 minutes (for high-energy treatments, 45-60 minutes is recommended). Afterwards, thoroughly cleanse and remove the anesthetic, wipe clean, and disinfect the skin. Use 70% alcohol or iodine to disinfect the skin surface, then wipe with saline.
- Apply conductive gel or serum (recommended): This helps evenly conduct energy.
Device commissioning and parameter settings: Adjust appropriate parameters based on the patient’s skin condition and treatment needs.
Operator gloves: The operator must wear disposable, sterilized medical gloves to prevent infection during the procedure.
After completing these preparatory steps, the actual microneedle RF treatment can begin.
Q: Who should avoid Microneedle RF treatment?
A:
Women during certain menstrual periods: menstruating, pregnant, and breastfeeding.
Patients with implants or serious medical conditions:
- Persons with pacemakers or internal defibrillators.
- Use with caution if you have any other metal piercings or implants anywhere in your body.
Patients with serious complications, such as heart disease, sensory impairment, epilepsy, uncontrolled hypertension, liver or kidney disease, leukemia, and vitiligo, should use with caution.
Patients with immunosuppressive diseases, such as AIDS, HIV immunosuppressive diseases, or those whose immune system is compromised due to use of immunosuppressive medications, should use with caution.
Patients with unhealthy skin conditions:
- Use is strictly prohibited if you have any active skin conditions in the treatment area, such as ulcers, psoriasis, eczema, rashes, open lacerations, skin injuries and abrasions, lesions, inflammation, or allergic conditions.
- Patients with severe scarring (such as keloids), poor coagulation mechanisms, abnormal wound healing, or very dry and fragile skin should use with caution.
- Use is not recommended for patients with a history of heat irritation (such as recurrent herpes simplex in the treatment area).
Those undergoing certain treatments or taking certain medications:
- Currently undergoing chemotherapy, radiation therapy, or cryotherapy should use with caution.
- Those with poorly controlled endocrine disorders, such as diabetes or thyroid dysfunction, or those with hormonal virilization should also use with caution.
- Those taking medications containing aspirin within two weeks prior to treatment should use with caution.
- Those who have received fillers such as hyaluronic acid, collagen, or fat grafting within six months prior to treatment must inform their doctor before surgery.
Anticoagulant medications and supplements should be discontinued one week prior to treatment.
Q: What post-treatment care should clients follow?
A:
- Immediate Care
- Cold Compress: Immediately after treatment, apply an ice compress to the skin for 10-20 minutes to help calm and soothe the skin. It is recommended to use an ice pack or medical ice pack, wrapped in plastic wrap or sterile gauze to prevent the ice pack from melting and wetting the treated area, which could lead to infection.
- Applying Repair Products: For 1-3 days after treatment, you may apply a repair ointment or antibiotic ointment.
2. Observing Normal Reactions:
- After treatment, the skin may feel slightly warm, accompanied by slight swelling and redness. This is normal. The warmth usually subsides within 1-3 hours, and the slight swelling and redness subside within 1-3 days.
- Itching is a normal wound healing process. Avoid scratching or rubbing the treated area to avoid damaging the skin barrier. Continued use of a medical dressing will aid recovery.
- Minor stinging or spotting is also normal.
- Short-Term Precautions & Care
- Cleansing:Avoid contact with raw water for 3-5 days after surgery to prevent infection.If needed, cleanse with saline or distilled water 24 hours later. Be gentle when cleaning; do not scrub the treated area. Pat dry with sterile gauze.
- Scabbing Management:Tiny scabs may form 1-3 days after surgery.Scabs usually fall off naturally in 5-10 days. Even if the scabs are itchy, let them fall off naturally; do not touch or scratch them to prevent infection.
- Avoid using facial cleansers, makeup, or powdered skincare products until the scabs fall off.
- Special Care Products: For 7-10 days after treatment, it is recommended to use medical repair products such as growth factors to promote skin regeneration morning and night, and apply a medical mask once a day to enhance repair.
- Activity Restrictions:
- For 7-10 days after surgery, avoid strenuous exercise, saunas, hot springs, and high-temperature showers. For 15 days after surgery, avoid excessive or vigorous massage or kneading of the treated area.
- Skincare:For 15 days after surgery, avoid using skincare products containing irritating ingredients, such as acids (such as glycolic acid and salicylic acid), A acid, exfoliants, high-concentration vitamin C, and alcohol.Starting from the third day, use sunscreen daily.
- Diet & Lifestyle
- Diet:After surgery, avoid dark-colored foods, such as soy sauce and beef. Avoid alcohol, spicy foods, and seafood.
- Water Temperature: Avoid using hot water when washing your face; use only lukewarm water.
- Rare Side Effects: In rare cases, acne may occur after surgery (possibly due to premature inflammation deep within the hair follicles or improper care). This condition usually resolves within 7-15 days. For those with thin, sensitive skin, subcutaneous bleeding may occur, which also resolves on its own within 7-15 days.
- Long-Term Considerations
- Sun Protection: For at least one month after surgery, strictly observe sun protection measures to prevent UV rays and hyperpigmentation. Prefer hard sun protection measures such as sun masks, hats, and umbrellas.
Other Cosmetic Treatments: Avoid secondary ablative procedures within one month after surgery, and avoid other radiofrequency or laser treatments.
Q: What results can clients expect and when?
A:
Immediate Improvement: After one treatment, pores appear smaller, skin becomes more radiant, and feels firmer.
Full/Visible Results:As collagen and elastin production continues, the full effects of the treatment are visible within 2-3 months. The effects of the treatment continue for up to 6 months. The skin remodeling process continues for 3 months.
Q: Are redness, swelling, or numbness normal after treatment?
A:
Yes, redness and slight swelling are normal after treatment. After the treatment, your skin may feel slightly warm, along with slight swelling and redness. This is normal. The warmth typically subsides within 1-3 hours, while the slight swelling and redness subside within 1-3 days.
This is a natural reaction of the skin, indicating that the treatment is stimulating its self-repair mechanisms.

Treatment
Q: What are the treatment steps?
A:
Consultation & Assessment
- Evaluate client’s skin concerns: wrinkles, scars, pores, laxity, stretch marks, etc.
- Identify contraindications (pregnancy, pacemaker, active infection, keloid tendency, etc.).
- Take before-treatment photos for progress tracking.
Cleansing & Preparation
- Cleanse the skin thoroughly to remove makeup, oil, and impurities.
- Disinfect the treatment area with antiseptic solution.
- Apply topical numbing cream (20–30 mins) to ensure comfort.
Marking the Treatment Zones (Optional)
- Divide the face or body area into small sections for precise, even treatment.
- Adjust needle depth & RF energy based on treatment zone:
- 0.5–1.0 mm → Eye area / fine wrinkles
- 1.0–2.0 mm → Face (cheeks, forehead, acne scars)
- 2.0–3.5 mm → Neck, abdomen, thighs, stretch marks, sagging skin
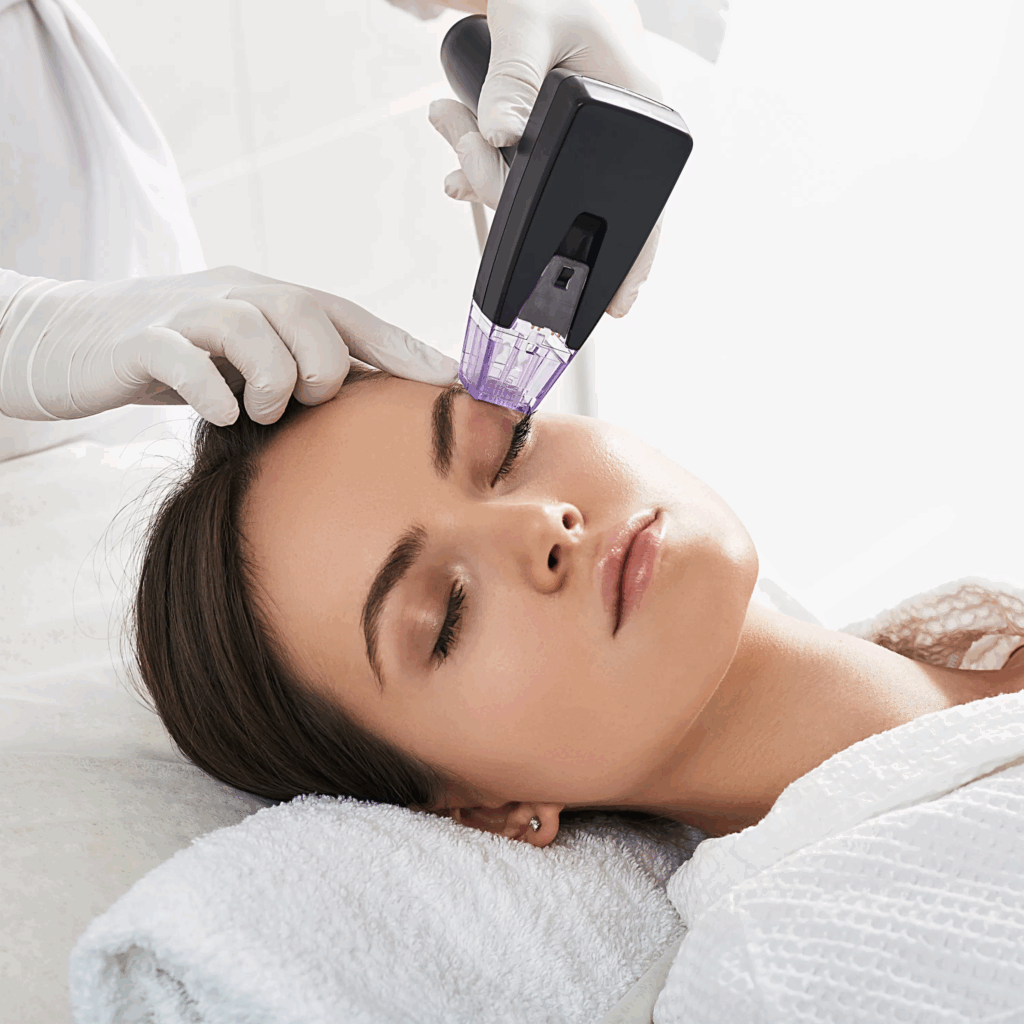
Microneedle RF Application
- The handpiece gently stamps fine insulated needles into the skin.
- RF energy is delivered into the dermis while sparing the epidermis → stimulates collagen & elastin remodeling.
- Work systematically across the entire treatment area, ensuring uniform coverage.
Post-Treatment Cooling & Care
- Apply soothing mask, aloe vera gel, or cold compress to calm the skin.
- Apply growth factors / hyaluronic acid serum for enhanced healing.
- Finish with moisturizer & sunscreen (SPF 30+).
Aftercare Instructions for Clients
- Expect mild redness, swelling, or pinpoint bleeding for 1–2 days.
- Avoid makeup, hot showers, saunas, and sun exposure for 48 hrs.
- Apply gentle hydrating products & SPF daily
- No exfoliation or harsh skincare for 5–7 days.
- Results improve progressively over 4–6 weeks as collagen rebuilds.
Treatment Frequency
- Standard: 3–4 sessions, spaced 4–6 weeks apart.
- Maintenance: 1 session every 6–12 months.
Q: What are safe needle depths for different areas?
A:
1.Face
- Forehead → 0.5 – 1.0 mm (thin skin, avoid too deep)
- Periorbital (around eyes) → 0.3 – 0.5 mm (very delicate area)
- Cheeks → 1.0 – 2.0 mm (moderately thick skin, good for acne scars)
- Nasolabial folds → 1.0 – 1.5 mm
- Upper lip / perioral → 0.5 – 1.0 mm
2.Neck & Jawline
- Neck (thin skin) → 0.5 – 1.5 mm
- Jawline → 1.0 – 2.0 mm
3.Body
- chest → 1.0 – 1.5 mm
- Arms → 1.0 – 2.0 mm
- Abdomen → 2.0 – 3.5 mm (thicker skin, for stretch marks & laxity)
- Thighs & buttocks → 2.0 – 3.5 mm
- Scars / Stretch marks (depending on depth) → 1.5 – 3.5 mm
Safety Notes - Always start at lower depth & energy, then increase gradually based on tolerance and area.
- Periorbital & bony areas (forehead, around eyes) need extra caution due to thin skin.
- Darker skin types (Fitzpatrick IV–VI) → use lower energy settings to reduce risk of PIH (post-inflammatory hyperpigmentation).
Rule of thumb: - Thin/sensitive areas → 0.3 – 1.0 mm
- Normal facial skin → 1.0 – 2.0 mm
- Body/thick skin → 2.0 – 3.5 mm
Q: How many passes per area are recommended?
A:
Standard Treatments (rejuvenation, fine lines, texture)
- 1–2 passes per area
- Usually enough for collagen stimulation and skin tightening.
Acne Scars / Deep Wrinkles
- 2–3 passes per area
- Different depths can be used in each pass (e.g., 2.0 mm first pass, 1.0 mm second pass).
Stretch Marks / Body Laxity
- 2–3 passes at higher depths (2.0–3.5 mm depending on thickness).
Sensitive Areas (forehead, periorbital, lips, neck)
- 1 pass only
- Always with lower energy & shallower depth.
Safety Notes
- Avoid overlapping too much → excessive passes increase risk of burns, PIH, or prolonged downtime.
- Allow slight overlap (10–20%) for uniform coverage.
- Always adjust by patient’s skin type (Fitzpatrick scale) and tolerance.
Rule of thumb:
- Face: 1–2 passes
- Scars/Stretch marks: 2–3 passes
- Sensitive areas: 1 pass
Q: How should pressure be applied?
A:
- Consistent, Firm but Gentle Pressure
- Apply steady, even pressure so all microneedles fully penetrate the skin to the programmed depth.
- Too light → incomplete penetration, uneven results.
- Too heavy → unnecessary trauma, more discomfort, risk of bruising.
- Maintain Full Contact
- The handpiece tip should be in flat, perpendicular contact with the skin (90° angle).
- Avoid tilting → ensures all needles enter evenly.
3.“Stamping”Technique
- Lift → place → press → deliver RF → lift → move slightly → repeat.
- Do not drag or slide the tip across skin (reduces injury and ensures uniform energy delivery).
- Pressure by Area
- Thicker areas (cheeks, body, stretch marks): slightly firmer pressure for full penetration.
- Thinner/sensitive areas (forehead, periorbital, neck): lighter pressure to reduce risk of bruising.
- Patient Feedback
- Always check patient comfort — if pain is disproportionate, pressure may be too high.
Rule of Thumb:
- Pressure should be just enough for the needles to reach the pre-set depth without forcing.
- Think “firm stamping” rather than pressing hard.
Q: What are the recommended energy levels?
A:
Recommended Energy Levels for Microneedle RF
(scale: low, medium, high, usually 1–10 or 1–50 units)
- Face – Thin & Sensitive Areas
- Forehead, eye area, upper lip:
- Energy: Low–Medium (Level 1–3 / 10–20%)
- Depth: 0.5–1.0 mm
- Goal: fine lines, wrinkles, skin tightening without excessive trauma
- Face – Thicker Areas
- Cheeks, jawline, chin, temples:
- Energy: Medium (Level 3–5 / 20–40%)
- Depth: 1.0–2.0 mm
- Goal: acne scars, large pores, lifting, collagen stimulation
- Neck & Décolleté
- Energy: Low–Medium (Level 2–4 / 15–30%)
- Depth: 1.0–1.5 mm
- Goal: skin tightening, elasticity, prevent post-inflammatory marks
- Body (Thicker Skin Areas)
- Abdomen, thighs, buttocks, arms, stretch marks, cellulite:
- Energy: Medium–High (Level 4–7 / 30–60%)
- Depth: 2.0–3.5 mm
- Goal: collagen remodeling, stretch mark reduction, skin laxity
Key Safety Tips:
- Always start low on new patients → increase gradually with tolerance.
- Use lower energy on darker skin types (Fitzpatrick IV–VI) to minimize risk of PIH.
- Combine multiple passes with moderate energy rather than one aggressive pass (safer, better results).
- Topical numbing cream (20–30 mins before) helps patients tolerate higher energy comfortably.
Rule of Thumb:
- Face: Low to Medium energy
- Body: Medium to High energy
- Adjust based on skin thickness, concern, and comfort
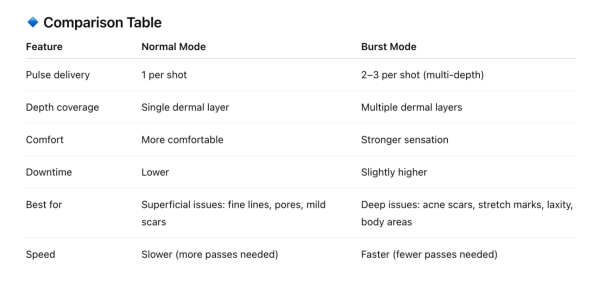
Q: What is the difference between Normal and Burst modes?
A:
Normal Mode (Single Pulse Mode)
- How it works:Each insertion delivers one single RF pulse at the chosen depth.
- Energy delivery: Concentrated, focused in one layer of dermis.
- Treatment effect:
More controlled, precise heating
Best for fine lines, wrinkles, pores, superficial scars
Lower downtime, safer for thin/sensitive areas (forehead, eyes, upper lip)
Burst Mode (Multi-Pulse Mode)
·How it works: Each needle insertion delivers 2–3 pulses sequentially at different depths
(e.g. 0.5 mm → 1.0 mm → 1.5 mm) without withdrawing the needle.
- Energy delivery:Multiple layers of dermis are treated in one shot.
- Treatment effect:
More intense collagen remodeling
Best for deep scars, stretch marks, laxity, body treatments
Shorter overall treatment time (fewer passes needed)
Higher discomfort and downtime compared to Normal Mode
In practice:
- Face (anti-aging, pores, fine wrinkles): Start with Normal Mode
- Deep acne scars, stretch marks, body tightening: Use Burst Mode
Q: What does “Once” vs. “Twice” mean?
A:
Once Mode
- Definition:The microneedles penetrate the skin → deliver one RF pulse → then retract.
- Effect:
More comfortable
Lower thermal effect
Safer for thin/sensitive areas (forehead, periorbital, upper lip)
Shorter downtime
Twice Mode
- Definition:The microneedles penetrate → deliver two RF pulses consecutively at the same depth before retracting.
- Effect:
Stronger heating → more collagen denaturation + remodeling
Better for stubborn wrinkles, deep scars, stretch marks, laxity
⚠Slightly more painful and more downtime compared to Once mode

Q: How long does treatment take?
A:
The treatment time for Microneedle RF depends on the treatment area size and whether you combine it with other steps (numbing, post-care, etc.). Here’s a breakdown:
Treatment Duration:
- Face (full face): ~20–30 minutes
- Small areas (forehead, eye area, upper lip): ~10–15 minutes
- Neck: ~15–20 minutes
- Face + Neck: ~30–40 minutes
- Body (abdomen, thighs, arms, stretch marks, scars): ~30–60 minutes depending on size
⚠Don’t forget to include:
- Topical anesthetic (numbing cream): 20–40 minutes before treatment
- Post-care soothing mask/serum: 10–15 minutes
So in practice, a full-face RF Microneedling session including numbing + aftercare takes about 60–90 minutes total.
Q: Can Microneedle RF be combined with PRP or serums?
A:
Yes — Microneedle RF can be safely combined with PRP or active serums, and this is actually a very popular protocol for boosting results.
Q: How often should treatments be performed?
A:
The treatment frequency for Microneedle RF depends on the indication, skin condition, and patient tolerance. Here are the general guidelines:
Treatment Interval:
- Every 4–6 weeks is standard (time needed for collagen remodeling and skin healing).
- Some mild rejuvenation cases can be treated every 3–4 weeks.
- For more aggressive treatments (deep scars, severe laxity), spacing may be 6–8 weeks.
Number of Sessions:
- Skin rejuvenation / fine lines / enlarged pores: 3–4 sessions
- Acne scars / stretch marks: 4–6 sessions
- Skin tightening / lifting: 3–5 sessions
- Maintenance: 1 session every 6–12 months
Q: What should I do if the client feels no sensation?
A:
If the client feels no sensation during treatment:
1.Check the Anesthesia
- If strong numbing cream was applied, sensation may be reduced.
- Light sensation should still be present, so if it’s completely absent, check the device settings.
2.Verify Needle Penetration
- Make sure the needles are actually penetrating the skin (look for uniform micro-channels or slight pinpoint bleeding in deeper settings).
- Poor contact or insufficient pressure can cause needles not to insert properly.
3.Check Energy Settings
- If the RF energy is set too low, the client may feel almost nothing.
- Increase gradually within safe parameters.
4.Check Handpiece Contact
- Ensure full and even contact with the skin surface.
- Gaps or slipping can prevent effective delivery.
5.Confirm Mode (Normal vs. Burst / Once vs. Twice)
- Sometimes if “Once” or low-energy “Normal” mode is selected, sensation may be minimal.
- Switch to the appropriate treatment mode depending on the indication.
Q: What should I do if the client feels pain?
A:
If the client feels pain during Microneedle RF
- Pause & Reassure
- Stop treatment immediately.
- Calmly ask the client to describe the pain (sharp, burning, stinging, or pressure).
- Check Anesthesia
- Ensure numbing cream was applied properly (30–45 mins for face).
- If the cream has worn off, reapply and wait before continuing.
- Review Parameters
- Needle depth – too deep in sensitive areas (e.g., periorbital, forehead) may cause pain.
- Energy level – high RF power can cause excessive heat.
- Mode – “Burst” or “Twice” mode delivers stronger stimulation than “Normal” or “Once.”
Lower settings if necessary and build up gradually.
- Check Technique
- Too much pressure when stamping can increase pain.
- Ensure smooth, even handpiece contact — uneven pressure can make some needles penetrate deeper.
- Cooling & Comfort
- Apply a cooling gel or cold air between passes to soothe.
- Offer breaks between sections.
- Hydration serums (HA, soothing essence) can help reduce discomfort.
Maintenance
Q: How do I clean the handpiece and cartridges after each use?
A:
Cleaning the Handpiece (Reusable Part)
1.Turn off & unplug device before cleaning.
2.Remove cartridge carefully (dispose if single-use).
3.Wipe exterior of the handpiece with a lint-free cloth soaked in medical-grade disinfectant (e.g., 70% isopropyl alcohol).
4.Avoid liquid entry into connectors or electrical parts. Do not submerge handpiece.
5.Dry thoroughly with a sterile gauze or cloth.
Cartridges / Needle Tips
- Single-use disposable cartridges → must be discarded immediately into a sharps container.
⚠Always follow manufacturer’s instructions — some cartridges are strictly single-use and re-sterilization is prohibited.
Q: How should the machine be stored safely?
A:
Safe Storage of the Device:
1.Cool, Dry Environment
- Store the device in a room with temperature 10–30°C (50–86°F).
- Humidity: ideally <70%, avoid damp areas to prevent corrosion.
2.Avoid Direct Sunlight & Dust
- Place the device in a shaded, dust-free environment.
- Use a protective dust cover when not in use.
3.Stable Surface
- Always keep the main unit on a flat, stable surface.
- Avoid tilting or stacking heavy items on top.
4.Power Safety
- Switch OFF and unplug after use.
- Use a surge protector to prevent electrical damage.
Storage of Handpieces & Cartridges:
1.Handpiece: place in its dedicated holder or padded case to prevent drops/damage.
2.Disposable cartridges: keep in original sterile packaging until immediately before use.
3.Multi-use cartridges: after sterilization, store in sealed sterile pouches until needed.
Long-Term Storage:
1.If storing for more than 1 month, run a quick function check before next use.
2.Avoid areas with chemicals, vapors, or high dust levels (can damage electronics & sterility).
Q: How often should the system be maintained?
A:
Routine Maintenance Schedule:
1.Daily (After Each Use)
- Clean the handpiece and disinfect the external surface.
- Dispose of used cartridges properly.
- Check cables and connectors for wear or looseness.
2.Weekly
- Inspect the handpiece tip for damage or residue.
- Check the touchscreen, buttons, and power cable.
- Wipe the air filters (if applicable) gently to prevent dust accumulation.
3.Monthly
- Run a self-test or calibration check (most systems have built-in diagnostic functions).
- Inspect the handpiece cable for bending or cracks.
- Ensure the device is operating at stable energy output.
4.Every 6–12 Months (Professional Service)
- Have the device checked by the manufacturer’s authorized service team.
- Calibration of RF energy levels.
- Electrical safety test and replacement of consumable parts if needed.
Q: What does the version number on the screen indicate?
A:
Clean after every treatment. Regularly check cartridge lifespan, replace consumables on time, and ensure proper storage to maintain stable operation.
Marketing Support & Certification
Q: Do you provide marketing support?
A:
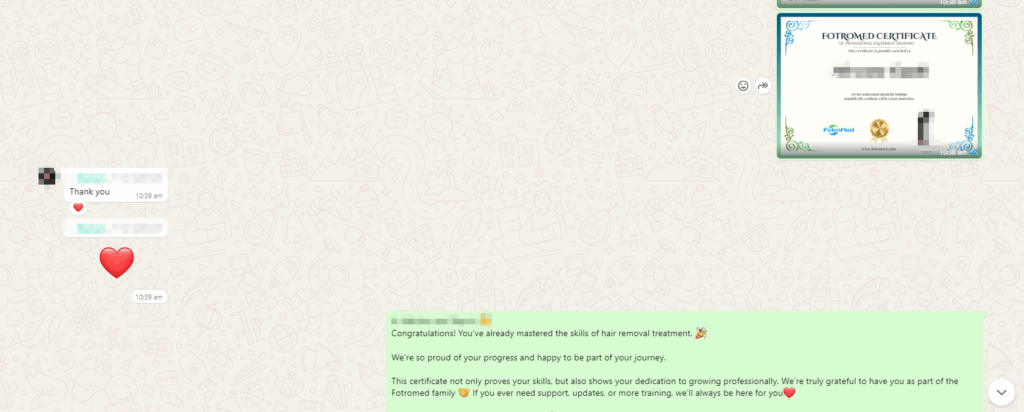
Yes, we will issue you a training certificate after you finished our training.

Q: Do you provide a training certificate?
A:
Yes, we provide full training with every machine, including operation, treatment protocols, and safety guidelines. After the training is completed, we issue an official certificate, which you can also display to build client trust.
Q: Can Microneedle RF be combined with other treatments for better results?
A:
Yes, Microneedle RF can be safely combined with other treatments to enhance results, as long as proper timing and protocols are followed. Here are the most common combinations:
Treatments That Combine Well with Microneedle RF
- PRP (Platelet-Rich Plasma) – boosts collagen regeneration and speeds healing.
- Often applied immediately after RF microneedling as a serum infusion (“Vampire Facial”).。
- Growth Factor / Mesotherapy Serums – RF creates microchannels, helping active ingredients penetrate deeper.
- LED Light Therapy – post-treatment red or blue LED can reduce inflammation, speed healing, and enhance collagen stimulation.
- Hydrafacial / Deep Cleansing Facial – can be done 1–2 weeks before RF to prepare the skin.
- Laser Treatments (e.g., CO2, ND:YAG, IPL) – usually performed 4+ weeks apart to avoid excessive irritation.
- Ultrasound or HIFU – combined in a treatment plan (not same day) to target deeper lifting + RF for surface/texture improvement.
Q: What other equipment is recommended for expanding my business?
A:
Expanding beyond Microneedle RF depends on your clinic’s target clients (anti-aging, slimming, hair removal, or full-service). Here’s a list of the most popular and profitable devices clinics add to grow their business:
- For Anti-Aging & Skin Rejuvenation
- HIFU (e.g., Ultralift SD, 7D HIFU) → Non-surgical lifting & tightening.
- Fractional CO2 Laser → Acne scars, wrinkles, pigmentation.
- LED Light Therapy System → Post-treatment healing & collagen boost.
- For Hair Removal & Pigmentation
- Diode Laser (e.g., LaseSmoothPro 1200W) → Fast, painless hair removal.
- ND:YAG Laser (FDA-certified) → Tattoo removal, pigmentation, vascular lesions.
- IPLmachine →skin rejunvention, pigmentation.
- For Body Slimming & Sculpting
- Emsculpt (HI-EMT) → Muscle building & fat reduction.
- Cryolipolysis (Fat Freezing) → Non-invasive body contouring.
- CelluShape / CelluSculpt Pro → RF + vacuum + cavitation for cellulite reduction.
- For Skin Diagnosis & Upselling
Skin Analyzer Machine → Helps with consultations, builds client trust, and increases treatment sales.
Tip for Business Growth:
- A strong combination is: Microneedle RF + HIFU + Diode Laser + Slimming Device (like Emsculpt or Cryolipolysis).
- This covers face + skin + body + hair removal = more client retention + higher ROI.
Trusted by Spas & Clinics Worldwide
Discover real spa & clinics using FotroHIFU devices. See how beauty professionals elevate treatments with trusted, advanced HIFU technology